
The Probability of Killing Hitler
In Black Orchestra you attempt to kill Hitler. You spend the game collecting and moving items, managing cards, choosing a plot, attempting to get everything just so for your dice-based attempt at winning the game. But just how perfect does your plan need to be?
A warning: this might suck some of the magic out of the plot rolling for you. Knowing exactly what to roll, and your precise odds of winning given that roll, may make that roll feel more like math and less like blowing up Hitler. If you want to Han Solo this thing, don't read.
I take some circuitous paths to get where we end up, explaining a lot of things along the way. So if you want to learn some probability (or if you already know it and you want to scour my work for the mistakes I surely made) then read on. If you just want the answer you can look in the back of the book.
Killing Hitler
When you attempt a plot, you roll a handful a six-sided dice. Two things have to happen for you to succeed:
1) You need enough "successes." You need a number of these equal to or greater than the military support. Each die has a success on 2 sides. Military support can range from 2-7 (well, 3-7 on standard difficulty).
2) You need to avoid "failures." Your suspicion level determines how many of these will cause you to fail. Each die has a failure on 1 side. Suspicion can run from 1-3 and cards can mitigate failures.
This can get pretty complicated, but let's build up to it. Or, more likely, you can just skip to the results at the end. But isn't it the journey that counts?
The Foundation
We're going to be using the binomial distribution for a good bit of our math. Basically, if you do some pass/fail checks with the same probability of success, and each of those checks are independent of each other (meaning that the outcome of one has no bearing on the others), then the binomial distribution is just the set of formulas that describes what's going on.
For example. You roll three d6's and need to know the chances of you getting all 6's. Each die is a single independent event; what you get on one die doesn't influence what you get on another die. The probability on each die that you get a six is 1/6.
So manually you could calculate this as: (1/6)*(1/6)*(1/6) = .00463 (basically, less than half a percent, AKA: unlikely).
The binomial distribution gives you the same thing. If you use a binomial distribution calculator with N = 3 and p = .166667 and x (# of successes) = 3, you'll also get .00463. So the binomial distribution allows us to use different numbers of dice (N), different chances of success (p), and report on different numbers of successes (x). We can use it to ask different questions, such as "what are the chances I get exactly three 6's?", "what are the chances I get at least two 6's?", or "what are the chances I get no more than one 6?"
And most importantly it keeps me from having to do all this crap by hand every time.
Those Pesky Eagles
The two requirements, taken by themselves, are pretty simple. Let's start with 2.
2) You need to avoid "failures." Your suspicion level determines how many of these will cause you to fail. Each die has a failure on 1 side. Suspicion can run from 1-3 and cards can mitigate failures.
You need to roll failures under your suspicion level. There are also cards that allow you to mitigate failures, but this doesn't change the math, it just lets you roll more before you fail.
What you're looking for here is the probability that you roll no more than X failures. If your suspicion is Extreme and you have no mitigating cards, then even one failure coming up will cause you to botch the plot, so in that case X=0. You need to roll no more than 0 failures.
The binomial distribution can help us here. The "CDF" of the binomial distribution gives us a cumulative probability. Meaning that it answers the question "what's the probability of X or fewer failures." If your suspicion level is two dice, and you have a card to mitigate one failure, what you care about is the probability that you roll 2 or fewer, because as long as you roll two or fewer, then those failures won't cause the plot to fail. Here's a spread of the probability that you don't roll over a certain number of failures for different sized dice pools. Basically, if you based success ONLY on failures rolled, these are the chances you succeed.

Many of these .99's would actually round to 1, but I rounded them down to show that they aren't a 100% sure thing.
Now, this isn't the whole picture (we're getting there). But just looking at the chances of you failing based on rolling eagles, there's a few things you can see. These are probably intuitively obvious to everyone, but now you have numbers to go with it.
- The more dice you add (reading down a column) the smaller your chances of avoiding failures. Even the rulebook points this out.
- You can't roll more failures than the number of dice you're rolling (those are the 1 probabilities). Thank goodness we have the math for this one.
- Your chances of the plot failing drop quickly the more failures you can survive. For example, with 5 dice at Extreme suspicion you've got a 40% chance that you don't roll any failures. If you have even ONE card that'll mitigate a single failure, you double your chances.
- I'll bring this up a bit later as well, but even though this isn't the whole picture, this is still an important chart. This is the chart that you don't get caught, regardless of whether or not you succeed. Getting caught means not only losing any items you used, but losing the plot card, being sent to prison, everyone losing motivation, someone losing time and suspicion to bail you out, and the group generally being a little nonplussed at your ability to roll dice and blaming you at the end of the night. So sometimes, if faced with the chance to try a random low-probability shot at a plot, whether or not you succeed is less important than whether or not you risk getting caught.
Anybody still with me?
Hittin' the Targets
Ok, so we know a bit about succeeding through not failing, but what about the other requirement?
1) You need enough "successes." You need a number of these equal to or greater than the military support. Each die has a success on 2 sides. Military support can range from 2-7.
You can't just avoid detection by the Gestapo, you also need to pull off the plot. For this you need at least X successes. Like the previous section, let's just look at this in a vacuum for now, as if the eagles weren't a thing.
If you roll 5 dice and need at least 3 successes then you'd be OK with 3, 4, or 5 successes. You'd curse at getting 0, 1, or 2. The probability of getting 0, 1, or 2 is the same as saying "the probability of 2 or fewer" and we already know how to do that from the above section; that's the CDF of the binomial distribution.
All of these options are mutually exclusive (if you got exactly 2 successes then you didn't get exactly 3 successes), which means that they all add up to 1. So you can use the method we've already used to get the probability of 2 or fewer successes and subtract that from 1 to get the probability of 3 or more successes.
Here's the chart. This is the probability you get at least a certain number of successes on a certain number of dice:

The difference between 0 and .00 is that 0 is flat out impossible and .00 is just rounded. It's nigh impossible.
Again, there's a bunch of obvious intuitive stuff you can see here:
- The more dice you roll, the better your chances of succeeding.
- You can't roll more success than the number of dice you roll.
- Your chances of succeeding plummet rapidly the higher the military support goes. If you're rolling 6 dice and military support is at 3, you've got a 32% chance of getting at least 3 successes. If military support is just one higher, your chances of success drop to 10%
- If military support is 4 or higher, it doesn't matter how many dice you roll, you're always more likely to fail than to succeed.
Get that military support down!
It's important to note that you can't stop here. You can't look at these two charts and say "I have an X chance of succeeding and Y chance of failing." It's more complicated than that. Hey, look, a segue.
Not A or B, but Both
Here's the tricky part. Separately these two mechanics are fairly intuitive. If you learned anything from the above charts, it was probably related more to the magnitude of the changes, not their direction.
But you don't need one or the other to succeed. You need both. You need at least a certain number of success and to avoid a certain number of failures. This is a joint probability.
If the probabilities of two things happening are independent of each other, you can just multiply them together to get the joint probability. We've done that already. If you roll two dice and want to know the chances of both coming up six then it's (1/6)*(1/6) = 1/36. Each die has a 1/6 chance of coming up six, and the result on one die doesn't affect the result of the other, so you can just multiply them.
That's not the case here. The probability you avoid failures and get successes are linked. If a die comes up as a failure, it can't come up as a success, and vice versa. If you made two separate rolls to check the two conditions, you could just multiply these together, but it's one roll with the same dice, so we can't do that.
I've stared at the screen for 15 minutes now trying to think of the best layman way to approach this. Let's see how I do!
As an example, let's say that you'll succeed if you get enough success and two or fewer failures. For now we're going to call the probability of you rolling at least enough success "P(B)".
So what we're after is P(B) and two or fewer failures. You can break that out as P(B) and 0 failures, the P(B) and 1 failure, and the P(B) and 2 failures.
These are mutually exclusive because the probability of exactly each of those numbers of failures are mutually exclusive. If you got exactly 2 failures, then you didn't get exactly 1 failure. So if you got both enough successes and exactly 2 failures, then you didn't get both enough successes and exactly 1 failure. Because these possibilities are mutually exclusive, we can add all of them up to get the P(B) and 2 or fewer failures.
So, how do we calculate each of those individual possibilities? The probability of two non-independent things happening at the same time is the probability that one happens multiplied by the probability that the other happens given that the first thing happened.
So if we need the probability that we get enough successes while getting exactly 1 failure, we look at the probability we get exactly 1 failure multiplied by the probability that we get enough successes given that we got exactly 1 failure. If we do that for every number of failures we're interested in, we can add those all up and get what we want.
That was a lot. I'm sorry. Here, relax with a stock photo.

The last thing we have to figure out is what is the probability you get enough successes given that you got a certain number of failures?
Basically, this just changes the scope of the original question we already answered. Before, we figured out what the chances of at least X success were on a certain number of dice, with the probability of getting a success being 2/6 (there's targets on 2 sides).
So, if you're rolling 4 dice and it's a given that you got exactly 1 failure, now we're just asking what's the probability you get enough successes on 3 dice (because 1 came up a failure) with probability 2/5. Why 2/5? Because you know that these 3 dice did not come up a failure, so you can ignore that option.
And that's all the pieces. This is a 3-way problem (dice, failures, successes) so I can't show it on one chart.
You Should Skip to Here
So, now we know all the pieces, what do we end up with?
I think it'll be the most helpful to break this out by military support (number of needed successes).
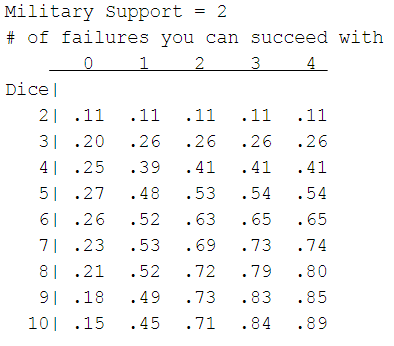
Before we list the rest, let's talk about this one. You can't get to 2 military support unless you play on easy, which meh. But this does help show us a couple things that are harder to see on the other charts. To note:
- As you add dice, you increase your probability for success up to a point, but then it starts to drop again. It doesn't look like that for the higher level of failure-proof, but that's just because the game is capped at 10 dice; if we presented it for a higher number of dice, you'd see it start to drop again.
- Being more failure-proof is generally better than rolling more dice, but that value caps out. Think about it. If you're rolling 3 dice and need 2 successes, it doesn't matter if you can mitigate a dozen failures. For you to succeed, two of those dice HAVE to come up successes, so your failure-proof value caps at 1 and never helps you more than that (you stay at a 26% chance, no how much mitigation you have). Building up a low suspicion and good cards to mitigate failures doesn't mean much if you can't roll more dice.
(Note, this is only true when discussing succeeding AND not being caught. Having more failure mitigation does matter if you're just trying to not get caught. On those 3 dice you could roll 3 eagles, and mitigating enough to not get caught, but still not succeed might be better than all the effects of going to prison. So more mitigation is never bad, even though it caps in its ability to help you win.)
- That said, you have got to lower your suspicion or get mitigating cards if you want a good chance to win. If even 1 failure will botch your plot, the best you can do is a 27% chance of success (on easy mode!). That ain't great. Being able to mitigate a couple failures, and getting the dice to take advantage of that, is how you're going to succeed.

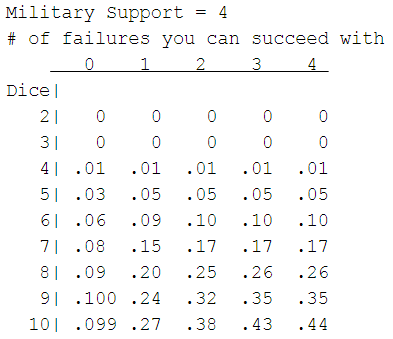
Ouch. Your numbers crash, here. Which sucks because this is the military support that most standard-difficulty games are going to go for. Note:
- You can't get three successes on two dice. Yay for math!
- The main reason to ask this question, to me, is to see what's going on with the whole "roll as many dice as you can, but NOT TOO MANY!" system. The bit of advice you could learn and remember is "at what point does adding an extra die hurt my chances instead of helping them?" In fact, it's even an official step of rolling for the plot that you have the chance to remove dice from the pool, so when should you do that?
And the biggest player in answering that question is the fact that you are limited to 10 dice. Overall, the function for this probability heads toward zero. If you rolled an infinite amount of dice (with a finite amount of failure mitigation) you would have a probability of success of zero.
But that doesn't start to kick in until you're rolling more dice. Yes, in both of these charts you can start to see the downward slope at the low levels of failure-proof. If you have very high suspicion and no cards to help, then there is such a thing as "too many dice."
Let's look at one more before we finish that thought.
That "good but then bad" effect for adding more dice all but disappears here. I rounded to an extra decimal place in the first column just so you could see that it is still there a bit. If you need any more successes than 4, it's gone completely.
These numbers are abysmal. Remember how more failure mitigation stops helping you at a certain point? Well, the more successes you need, the lower that point is. With the maximum number of dice, no matter how much mitigation you have, you're capped at about a 44% chance of winning if you need 4 successes.
Note that as your failure-proofness increases, the numbers cap out at just your overall probability of success ignoring failures that we showed in the second chart of this article. This tracks. As failures become a non-issue, your overall chance of success has much less to do with them and is closer to just your probability at getting the successes you need.
So, adding more dice hurts you when you need fewer successes and you can soak up fewer failures. If you need 2 successes there's a few places where the effect is more pronounced, but that only happens on easy and I'm less interested in that.
If you need 3 successes (the best you can do on standard difficulty) and can't roll any failures, don't roll any more than 7 (eight looks the same, but it's rounded up). That's...it. Otherwise, roll as many dice as you can. Hell, rolling 8 dice on one roll is pretty tough anyway. And the only time it hurts you is if you can't roll any failures, which is a game state your actively trying to avoid anyway.
Again, this is only when considering WINNING, not when considering not going to prison. There could be times when you would reduce dice, so I don't want to say to never do it. But I think they're infrequent.
For example, player A is all built up to do a high-dice roll and go for the win, and is at Committed motivation. Player B has a Plane Bomb and enough to roll a few dice if Hitler happens to move, but the odds of that succeeding are low. Hitler moves. Player B could attempt the plot. Their plot isn't likely to succeed, but you got to take the shots when they come right?
But! Going to prison would mean Player A loses a motivation, thus meaning they can't attempt their good plot. So, it's possible that either player B shouldn't try this, or if they do, they should reduce the dice a bit to reduce the chances they go to jail, even though it will still lower their overall probability of winning the game. There's no right way to answer this (though if not getting caught is critical, lower the dice to your failure mitigation and if that doesn’t leave you with enough to succeed then ignore it all together), you just have to weigh the odds and take your shot. Or don't.
What have we learned?
You Should Probably Have Skipped to Here
- Unless you're going for a Hail Mary, you've got to wait until military support is at 3. With support of 4 or higher you will always be more likely to fail than to win.
- Having to roll 0 failures sucks. Lower your suspicion or get some mitigation cards. Going from 0 to 1 or 0 to 2 failures that you can still succeed with is some of the biggest jumps in success probability you can get.
- That said, don't overdo it on failure mitigation at the expense of more dice. Subtract the number of successes you need from the number of dice you're rolling. If you can survive that many failures, you're done. More mitigation won't help you. Get more dice.
- And that said, there are three possible outcomes to each roll: success, fail, prison. The above point is true when discussing success, but not true when discussing "not going to prison." If you don't get the successes you need, that's more dice that could come up a failure that you'll want to mitigate. So, yes, keep suspicion low and keep mitigating cards. The hard part is knowing when to use them, and when to suck it up and don the orange jumpsuit.
- Though the joint probabilities are interesting, the very first chart is still useful. You can read that simply as "what are the chances, regardless of succeeding, that I don't get thrown in prison." If you've got a couple low-dice plots and low enough suspicion, getting caught can be pretty easily avoided. If you can afford to lose the items (you aren't saving them for higher-probability plots), might as well. Your chances of succeeding might be only 10 or 20 percent, but a win's a win. But the effects of getting caught could break the game for you, so sometimes that by itself is more important.
- Despite the rules allowing you to remove dice from the pool, if you're going for the win, don't (considering the above points). If you're playing on easy and military support is at two and you're going for a risky roll, yeah, sure, maybe too many dice could be a problem. If you're playing on standard difficulty, get as many dice as you can.
- There is a card that gives you a free success. But it only works if military support is at 5 or higher. So if you're at 5, and have this card, you'll just read the chart for 4 successes, which is a chart with a hell of a lot of zeros on it. It's a huge jump in your chances of success, but from basically no chance to a very unlikely chance. Obviously it's better to get support down to 3 or 4, but if it's try a plot at 5 or lose the game, then this will help.
- There are a couple of cards that let you reroll a die. These are amazing, but they're pretty tough to factor into the charts, so they aren't there. Basically, playing one of these is almost as good as a failure mitigation (5 out of 6 times, rerolling a failure will get rid of it), and it's got a 1/3 chance of getting you another success. What's badass about it, though, is that it can do BOTH. Rolling a failure into a success is a huge swing. Keep these cards.
And last:
- Have a backup plan. Have three. None of these numbers are particularly wonderful, especially if military support is high. Try not to back yourself into a corner where failing a low-probability roll spells the end of the game. On hard difficulty, they're all low probability rolls. On standard, if you can time your attack to when support is at 3, you're still looking at a coin flip a lot of the time, and praying for heads.
The trick is going to be setting up enough shots at it that your chances of winning on ONE of them is good. You can't just add the probabilities together, though. Say each time you go for the plot, you're getting a 30% chance. If you do that twice, you've got a 51% chance of winning the game. Three times and you're up to 66%. Four and you're at 76%. That'll be tough to pull off, as you're probably losing items every time, if not worse. But consistent winning is going to be less about one all-or-nothing roll, and more about a handful of pretty good shots.
Viel Glück